Equipping a kayak with sonar technology involves several key steps, from selecting the right equipment and mounting location to wiring and securing the various components. A typical installation includes mounting the transducer, running power cables to the battery, and positioning the display head within easy reach of the paddler. Different mounting methods exist for transducers, including through-hull, transom mount, and inside-hull options, each with its advantages and disadvantages.
Enhanced angling success is a primary driver for adding sonar to a kayak. Knowing the depth, bottom structure, and presence of fish significantly increases the chance of a successful fishing trip. This technology has evolved considerably from basic depth sounders to sophisticated systems providing detailed underwater mapping and fish identification. The ability to accurately interpret this data can give kayak anglers a distinct advantage, allowing them to target specific areas and species more effectively. This has become increasingly important as kayak fishing grows in popularity and anglers seek more efficient ways to find and catch fish.
Several crucial factors influence the installation process, including the type of fish finder selected, the kayak’s design, and the user’s technical skills. Careful planning and execution are essential for a successful outcome, ensuring both the functionality of the equipment and the safety of the kayaker. Subsequent sections will explore these considerations in detail, guiding readers through the process from choosing the appropriate equipment to achieving a clean and effective installation.
Tips for Fish Finder Installation in a Kayak
Careful planning and execution are crucial for a successful fish finder installation. These tips offer guidance for a clean and functional setup.
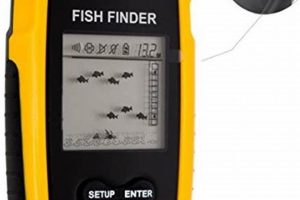
Tip 1: Choose the Right Fish Finder: Consider the kayak’s size and fishing style. Smaller kayaks benefit from compact units, while larger vessels can accommodate more sophisticated systems. Features like GPS and chartplotting enhance navigation and waypoint marking.
Tip 2: Select an Appropriate Transducer Mounting Location: Transom mounting offers simplicity, while through-hull mounting provides the best performance but requires more invasive installation. Inside-hull mounting is a viable option for smooth-bottomed kayaks but may compromise signal quality.
Tip 3: Plan Cable Routing Carefully: Ensure cables are routed away from paddles and other gear to prevent interference and entanglement. Use cable ties or clips to secure wiring and maintain a clean setup.
Tip 4: Use a Dedicated Battery: Avoid draining the kayak’s primary battery by using a separate 12V battery specifically for the fish finder. This ensures consistent power and prevents unexpected shutdowns.
Tip 5: Waterproof all Connections: Protect electrical connections with marine-grade sealant or heat shrink tubing to prevent corrosion and ensure reliable operation in wet conditions.
Tip 6: Test the System Before Launching: Verify all connections and ensure the fish finder operates correctly before entering the water. This allows for troubleshooting and adjustments without the inconvenience of being on the water.
Tip 7: Consider a Portable Mounting System: For versatility and ease of removal, a portable mount allows the fish finder to be easily detached and stored when not in use.
Following these guidelines ensures a functional and reliable fish finder installation, maximizing angling potential and enhancing the overall kayaking experience.
By addressing these practical considerations, kayak anglers can confidently embark on their fishing adventures, equipped with the technology to explore the underwater world effectively.
1. Planning
A successful fish finder installation in a kayak hinges on thorough planning. Pre-installation considerations significantly impact the effectiveness and longevity of the system, influencing everything from equipment choices to final mounting locations. Careful planning minimizes potential issues and maximizes the functionality of the fish finder.
- Equipment Selection
Choosing the right fish finder and transducer depends on individual fishing needs and the kayak’s characteristics. Factors like target species, fishing environment (freshwater or saltwater), and kayak size dictate the appropriate transducer type and fish finder features. A kayak angler fishing in shallow freshwater might opt for a basic sonar unit with a transom-mounted transducer, while an angler targeting offshore species would benefit from a more advanced system with GPS, chartplotting, and a through-hull transducer. Choosing compatible accessories, such as mounting brackets and power cables, is also essential during the planning stage.
- Kayak Compatibility
Understanding the kayak’s construction and layout is crucial for determining feasible mounting locations and cable routing paths. Sit-on-top kayaks offer more mounting flexibility compared to sit-inside kayaks. The presence of hatches, scupper holes, and other structural features influences installation options. Evaluating the kayak’s available space and accessibility helps ensure a clean and ergonomic setup.
- Power Management
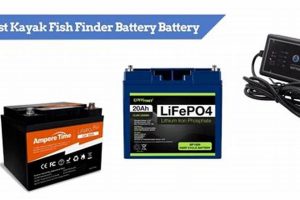
Determining the power requirements of the fish finder and selecting an appropriate battery are key planning steps. A dedicated 12V marine battery is recommended to prevent draining the kayak’s primary battery, especially for prolonged use. Calculating battery capacity based on fish finder consumption and planned fishing duration ensures uninterrupted operation. Planning the battery placement and cable routing minimizes clutter and optimizes weight distribution within the kayak.
- Layout and Ergonomics
Visualizing the final layout and considering ergonomic factors during the planning phase contributes to a user-friendly setup. The display head should be positioned within easy reach and sightline of the paddler. Transducer placement requires careful consideration to avoid interference from the kayak’s hull or other equipment. Planning cable routes to minimize entanglement and maintain a clean cockpit enhances safety and convenience on the water.
By addressing these factors in advance, kayak anglers can avoid common installation pitfalls and ensure a seamless integration of the fish finder system. Thorough planning translates to a more efficient and enjoyable fishing experience, allowing anglers to focus on locating fish rather than troubleshooting equipment issues. This proactive approach maximizes the benefits of the fish finder technology and enhances overall angling success.
2. Transducer Placement
Transducer placement is paramount for optimal fish finder performance in a kayak. The transducer acts as the fish finder’s eyes, transmitting and receiving sonar signals. Its location directly influences the quality of data received, impacting the angler’s ability to interpret bottom structure, depth, and fish presence. Incorrect placement can lead to interference, inaccurate readings, or complete signal loss. Therefore, careful consideration of transducer placement is essential during the installation process.
Several factors influence optimal transducer placement. Kayak hull design, including the presence of chines or skegs, plays a significant role. Mounting the transducer too close to these features can create turbulence, disrupting the sonar cone and leading to inaccurate readings. Propeller wash, if applicable, must also be considered, as it can generate significant interference. Ideally, the transducer should be positioned in clear, undisturbed water flow. For example, on a sit-on-top kayak, a transom-mounted transducer slightly offset from the centerline often provides the best results. On a sit-inside kayak, an inside-the-hull mounting location may be necessary, requiring careful attention to the bonding surface and potential signal attenuation.
Understanding the different mounting options and their implications is crucial. Through-hull transducers offer the cleanest signal but require more invasive installation. Transom-mounted transducers provide a balance between performance and ease of installation. Inside-hull transducers avoid external protrusions but may compromise signal quality. The chosen mounting method must align with the kayak’s structure and the desired level of performance. Selecting the correct placement ensures accurate depth readings, clear bottom definition, and reliable fish detection, significantly impacting the angler’s success and overall fishing experience.
3. Wiring and Power
Proper wiring and power management are critical for a successful fish finder installation in a kayak. A reliable power source and correctly connected wiring ensure consistent fish finder operation, preventing disruptions during use. Incorrect wiring can lead to power fluctuations, damage to the fish finder, or even safety hazards. Careful attention to these aspects ensures the system functions as intended and contributes to a safe and enjoyable kayaking experience.
- Power Source Selection
Choosing the correct power source is fundamental. A dedicated 12V deep-cycle marine battery is recommended to power the fish finder. Using the kayak’s primary battery is discouraged, as draining it can leave the kayaker stranded. Battery capacity should align with the fish finder’s power consumption and anticipated usage time. A battery with sufficient amperage-hours ensures uninterrupted operation throughout the fishing trip. For instance, a fish finder drawing 2 amps and used for 8 hours requires a battery with a minimum capacity of 16 amp-hours.
- Wiring Gauge and Type
Selecting the correct wire gauge is essential for preventing voltage drop and ensuring sufficient current delivery to the fish finder. Using a wire gauge that is too thin can lead to overheating and potential damage to the equipment. Marine-grade tinned copper wire is recommended for its corrosion resistance and durability in harsh marine environments. Consulting the fish finder manufacturer’s recommendations for wire gauge based on the unit’s power consumption and cable length ensures optimal performance and safety.
- Fuse Protection
Incorporating an inline fuse near the battery positive terminal protects the fish finder and wiring from damage in case of a short circuit or overload. The fuse rating should match the fish finder’s current draw, preventing excessive current flow and potential fire hazards. Using a fuse with a higher rating than necessary negates its protective function. A properly sized fuse acts as a safety barrier, interrupting the circuit in the event of a fault and preventing damage to the fish finder and the kayak’s electrical system.
- Connection Integrity
Ensuring secure and waterproof connections is crucial for reliable operation and preventing corrosion. All exposed connections should be sealed using marine-grade sealant or heat shrink tubing. This prevents water intrusion and protects against corrosion caused by exposure to saltwater or moisture. Properly sealed connections maintain electrical conductivity and ensure the long-term functionality of the fish finder system.
Meticulous attention to wiring and power connections ensures reliable fish finder operation and contributes significantly to a safe and productive kayak fishing experience. A properly powered and wired system allows anglers to focus on locating fish without the distraction of equipment malfunctions or safety concerns. By understanding the importance of power source selection, wire gauge, fuse protection, and connection integrity, kayak anglers can confidently install and operate their fish finders, maximizing their angling potential.
4. Display Mounting
Effective display mounting is integral to a successful fish finder installation in a kayak. Proper placement and secure mounting of the display head directly influence user experience and the practicality of utilizing the fish finder’s features. A poorly mounted display can hinder visibility, impede paddle strokes, and create distractions, compromising both safety and fishing effectiveness. Strategic display placement, therefore, optimizes functionality and enhances the overall kayaking experience.
- Visibility and Accessibility
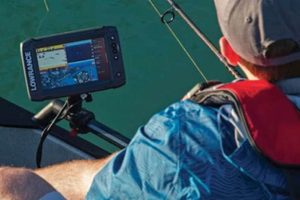
The display head must be positioned within the paddler’s clear line of sight and easily accessible for operation. Constant head movement to view the display can strain the neck and distract from paddling and fishing. Optimal placement allows for quick glances at the screen without compromising posture or balance. Consideration of the kayak’s layout and the paddler’s typical seated position is crucial during the planning phase. Mock installations using cardboard cutouts or similar placeholders can help determine the most ergonomic and practical mounting location.
- Mounting Stability and Security
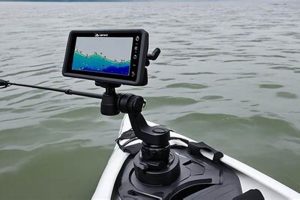
Secure mounting ensures the display head remains stable during paddling and under various on-the-water conditions. Vibrations and impacts can dislodge a poorly mounted display, leading to damage or loss of the unit. Utilizing robust mounting hardware and appropriate mounting surfaces is essential. Ram mounts and specialized kayak fish finder mounts offer adjustable positioning and secure attachment options. Ensuring the mounting system can withstand the stresses of paddling and potential impacts safeguards the investment and maintains functionality.
- Integration with Kayak Layout
Display mounting must integrate seamlessly with the kayak’s overall layout, minimizing interference with paddling and other onboard equipment. The display should not obstruct paddle strokes, access to storage compartments, or other essential gear. Cable routing plays a significant role in maintaining a clean and organized cockpit. Carefully planning cable paths and securing them with clips or ties prevents entanglement and maintains a clutter-free environment, enhancing both safety and efficiency.
- Glare and Weather Protection
Minimizing glare and protecting the display from the elements enhance visibility and prolong the unit’s lifespan. Positioning the display to avoid direct sunlight reflection improves readability. Consider mounting locations that offer some degree of natural shade from the kayak’s hull or accessories. Protective covers or sun shields further minimize glare and shield the display from rain and spray. These precautions maintain screen visibility in varying light conditions and protect the electronic components from moisture damage.
By addressing these factors, display mounting becomes an integral component of a successful fish finder installation, optimizing its usability and enhancing the overall kayak fishing experience. A strategically positioned and securely mounted display allows anglers to effectively utilize the fish finder’s capabilities without compromising comfort, safety, or efficiency on the water.
5. Cable Management
Effective cable management is crucial for a successful fish finder installation in a kayak. Properly routed and secured cables prevent interference, minimize clutter, and enhance safety. Loose or tangled wires can obstruct paddling, snag fishing gear, and potentially damage the fish finder system. A well-organized wiring setup contributes to a clean and functional cockpit, optimizing both fishing efficiency and overall kayaking experience.
- Preventing Interference
Strategic cable routing minimizes potential interference with the fish finder’s transducer signal and other electronic devices. Cables carrying power or data should be kept away from the transducer cable to avoid signal disruption. Crossing cables at right angles minimizes electromagnetic interference. Proper separation prevents signal degradation and ensures accurate fish finder readings. For example, routing power cables along the opposite side of the kayak from the transducer cable minimizes potential interference.
- Minimizing Clutter and Enhancing Safety
Securing cables with clips, ties, or tubing keeps the kayak’s cockpit clean and organized. Loose cables create tripping hazards and can snag on paddles or fishing gear, posing a safety risk. Proper cable management eliminates clutter, allowing for free movement and unobstructed access to essential equipment. For instance, using adhesive clips to secure cables along the kayak’s gunwales maintains a tidy cockpit and prevents entanglement.
- Protecting Cables from Damage
Routing cables through protected channels or conduits shields them from abrasion, UV exposure, and other potential damage. Exposed cables are susceptible to wear and tear, leading to shorts or malfunctions. Protecting cables extends their lifespan and maintains the reliability of the fish finder system. Running cables through existing channels in the kayak’s hull or using flexible conduit provides additional protection.
- Facilitating Maintenance and Troubleshooting
Organized cable management simplifies maintenance and troubleshooting. Clearly labeled and logically routed cables allow for easy identification and access, should repairs or modifications become necessary. A well-organized system facilitates quick diagnosis and resolution of any wiring issues, minimizing downtime and maximizing fishing time. Using different colored cables for power and transducer connections, for example, aids in identification and troubleshooting.
By prioritizing cable management during the fish finder installation process, kayak anglers create a safe, functional, and efficient on-the-water experience. A well-organized wiring system minimizes potential problems, enhances the longevity of the equipment, and allows anglers to focus on fishing without the distractions of tangled wires or equipment malfunctions. This meticulous approach maximizes the benefits of the fish finder technology and contributes significantly to a positive and productive kayak fishing adventure.
6. Battery Selection
Appropriate battery selection is a critical aspect of fish finder installation in a kayak. The battery powers the fish finder unit, directly impacting its operational lifespan and performance. An inadequate power source can lead to inconsistent readings, premature battery failure, and potential disruption of the fishing experience. Careful consideration of battery specifications and kayak-specific needs ensures reliable fish finder operation and maximizes time on the water.
- Battery Type and Chemistry
Deep-cycle marine batteries are specifically designed for sustained power delivery, making them ideal for powering fish finders. Unlike starting batteries designed for short bursts of high current, deep-cycle batteries tolerate repeated discharging and recharging cycles without significant performance degradation. Within the deep-cycle category, AGM (Absorbent Glass Mat) and lithium batteries offer advantages in terms of safety, durability, and weight compared to traditional flooded lead-acid batteries. Lithium batteries, while more expensive, provide significantly higher energy density and longer lifespans, making them attractive for kayak anglers seeking lightweight and long-lasting power solutions.
- Capacity and Amperage-Hour (Ah) Rating
Battery capacity, measured in Amperage-hours (Ah), determines how long the fish finder can operate on a single charge. The fish finder’s power consumption, typically measured in amps, dictates the required battery capacity. Calculating the expected usage time and multiplying it by the fish finder’s amperage draw provides an estimate of the minimum Ah rating required. For example, a fish finder drawing 1.5 amps used for 6 hours requires a battery with at least a 9 Ah rating (1.5 amps x 6 hours = 9 Ah). Selecting a battery with slightly higher capacity provides a safety margin and extends operational time.
- Physical Size and Weight
Kayak anglers must consider the battery’s physical dimensions and weight. Limited space within a kayak necessitates selecting a battery that fits comfortably within the designated compartment or storage area. Excessive weight can negatively impact the kayak’s stability and maneuverability. Compact and lightweight batteries, such as lithium-ion options, offer advantages in kayak applications where space and weight are critical considerations. Balancing battery capacity with size and weight ensures optimal kayak performance and angler comfort.
- Battery Mounting and Safety
Secure battery mounting is essential to prevent shifting and potential damage during transport and on-the-water operation. A dedicated battery box provides protection and secure mounting points. Proper ventilation around the battery is crucial, especially for flooded lead-acid types, to prevent the buildup of explosive gases. Following manufacturer recommendations for battery mounting and ventilation ensures safety and prolongs battery lifespan. Furthermore, incorporating a fuse in the positive battery cable protects the fish finder and wiring from damage in the event of a short circuit.
Careful battery selection ensures reliable fish finder operation and contributes significantly to a successful kayak fishing experience. Matching battery type, capacity, and physical characteristics to the specific demands of kayak fishing ensures consistent power delivery, maximizes operational time, and enhances safety. By understanding these key considerations, kayak anglers can confidently choose the right battery to power their fish finders, allowing them to focus on locating fish and enjoying their time on the water.
7. Waterproofing
Waterproofing is paramount when installing a fish finder in a kayak. Kayaks operate in inherently wet environments, exposing electronics to constant moisture, spray, and potential submersion. A robust waterproofing strategy safeguards the fish finder system, ensuring its longevity and reliable performance. Neglecting waterproofing measures can lead to corrosion, short circuits, and ultimately, equipment failure. Therefore, meticulous attention to waterproofing during the installation process is crucial for preserving the fish finder investment and ensuring uninterrupted operation on the water.
- Connection Sealing
Exposed electrical connections are particularly vulnerable to water intrusion. Thorough sealing of all connections using marine-grade sealant or heat shrink tubing prevents corrosion and ensures reliable conductivity. This includes connections at the battery terminals, fuse holders, and transducer cable entry points. Diligent sealing prevents moisture from reaching sensitive electronics, preserving the integrity of the fish finder system and preventing malfunctions caused by water damage.
- Transducer Mounting
Depending on the chosen transducer mounting method (transom mount, through-hull, or inside-hull), specific waterproofing considerations apply. Through-hull installations require careful sealing around the transducer’s mounting hole to prevent leaks. Transom-mount transducers benefit from a bead of sealant around the mounting bracket to prevent water from seeping into the hull. For inside-hull installations, ensuring a strong and waterproof bond between the transducer and the hull’s inner surface is essential for maintaining hull integrity and preventing signal interference caused by trapped water.
- Display Unit Protection
While many fish finder display units are designed with a degree of water resistance, additional protective measures further safeguard against moisture damage. Utilizing a waterproof cover or case provides an extra layer of defense against rain, spray, and accidental submersion. Regularly inspecting the display unit for any signs of water intrusion or seal damage ensures its long-term functionality. Avoiding harsh cleaning chemicals and storing the unit in a dry location when not in use further contribute to its longevity.
- Cable Routing and Protection
Water can follow cable pathways into the kayak’s hull, potentially reaching sensitive electronics. Routing cables through sealed conduits or channels minimizes this risk. Using waterproof connectors and cable glands where cables pass through bulkheads or deck fittings further enhances waterproofing. Securing cables tightly against the kayak’s structure with waterproof clips or ties prevents water from pooling around connections and seeping into the hull. Careful cable management contributes significantly to overall system waterproofing and prevents potential water damage.
Comprehensive waterproofing is integral to a successful fish finder installation in a kayak. Meticulous attention to connection sealing, transducer mounting, display unit protection, and cable routing ensures the fish finder system remains functional and reliable despite constant exposure to moisture. These preventative measures safeguard the investment and allow kayak anglers to focus on fishing without the distraction of equipment malfunctions caused by water damage. A properly waterproofed fish finder installation enhances the overall kayaking experience and contributes to many productive fishing trips.
Frequently Asked Questions
Addressing common queries regarding fish finder installation in kayaks clarifies potential uncertainties and facilitates informed decision-making. These responses aim to provide comprehensive insights and practical guidance for a successful installation process.
Question 1: What type of transducer is best suited for kayak installation?
Transducer selection depends on kayak hull characteristics and fishing environment. Transom-mount transducers offer versatility and relatively easy installation. Through-hull transducers provide optimal performance but require more invasive mounting. Inside-hull transducers suit smooth-bottomed kayaks but may compromise signal clarity.
Question 2: Is a dedicated battery necessary for powering a fish finder in a kayak?
A dedicated 12V marine battery is strongly recommended. This prevents draining the kayak’s primary battery, ensuring propulsion and other essential functions remain unaffected. It also isolates the fish finder from potential electrical interference from other onboard systems.
Question 3: How can interference with the fish finder signal be minimized?
Proper cable routing and separation are crucial. Power cables and transducer cables should be routed separately and, if they must cross, should do so at right angles. Keeping the transducer clear of obstructions and turbulence also minimizes interference.
Question 4: What precautions ensure waterproof integrity of the installation?
All electrical connections require thorough sealing with marine-grade sealant or heat shrink tubing. Transducer mounting locations require specific sealing depending on the mounting method. Protecting the display unit with a waterproof cover adds an additional layer of security.
Question 5: What factors influence the optimal display mounting location?
Visibility, accessibility, and stability are key considerations. The display should be easily viewable without obstructing paddling movements. Secure mounting prevents dislodgement due to vibrations or impacts. Integration with the kayak’s layout should maintain a clean and uncluttered cockpit.
Question 6: How can cable management enhance the installation’s longevity and functionality?
Securing cables with clips or ties prevents entanglement and protects them from abrasion and damage. Organized cable routing simplifies maintenance and troubleshooting, contributing to the long-term reliability of the fish finder system.
Careful consideration of these frequently asked questions facilitates a more informed and effective fish finder installation process, ultimately enhancing the kayak fishing experience.
Further exploration of specific installation techniques and troubleshooting tips can provide additional guidance for addressing individual needs and challenges.
Conclusion
Successfully integrating a fish finder into a kayak requires careful planning and execution. Key considerations include transducer selection and placement, power management, display mounting, and meticulous waterproofing. Understanding these elements ensures optimal performance, minimizes potential issues, and maximizes the benefits of this valuable technology for kayak anglers.
Strategic installation empowers anglers with enhanced underwater insights, leading to more informed decisions and increased fishing success. The ability to interpret depth, bottom structure, and fish location significantly elevates the kayak fishing experience. Continuous advancements in fish finder technology promise even more refined capabilities, further enhancing the pursuit of angling excellence from a kayak.


