Equipping a kayak with sonar technology involves several key decisions and steps, from selecting the right transducer mounting location to powering and securing the display unit. Common mounting options include using a scupper hole mount, an adhesive mount directly to the hull, or utilizing a specialized bracket system. Each approach offers distinct advantages and disadvantages regarding stability, ease of installation, and potential impact on the kayak’s maneuverability. Choosing the appropriate power source, whether a dedicated battery or connection to the kayak’s existing electrical system, is also critical. Finally, cable management is essential to ensure a clean setup and prevent tangles or damage.
This enhancement significantly improves angling success from a kayak by providing real-time underwater insights. Knowing the water depth, bottom structure, and fish location allows anglers to target specific areas and depths, maximizing their chances of a catch. The ability to precisely position oneself over promising underwater features eliminates guesswork and enhances efficiency. Historically, kayak anglers relied heavily on intuition and experience to locate fish. The advent of portable and mountable sonar units dramatically transformed the sport, offering an unprecedented level of precision and control. This technology empowers anglers of all skill levels to explore new waters and refine their techniques with greater confidence.
This article will explore the various methods for transducer and display mounting, power supply options, cable management best practices, and tips for selecting the right sonar unit for different kayaking environments. Understanding these aspects will ensure a smooth installation and optimal performance, leading to a more rewarding kayaking experience.
Tips for Sonar Installation on Kayaks
Proper installation ensures optimal performance and longevity of the fish finder unit. Careful consideration of these tips will contribute to a successful setup.
Tip 1: Transducer Placement: Select a location that minimizes turbulence and interference. Areas near the stern or along the centerline are generally preferred. Avoid positioning the transducer near scupper holes or areas prone to water splashing.
Tip 2: Mounting Surface Preparation: Ensure the mounting surface is clean and dry before applying any adhesive or mounting hardware. Roughening the surface with fine-grit sandpaper can improve adhesion.
Tip 3: Secure Cable Management: Use cable ties or clips to secure all wiring along the kayak’s structure. This prevents tangles and protects cables from damage. Route cables away from paddles and other moving parts.
Tip 4: Power Source Considerations: Choose a dedicated battery with sufficient capacity for the fish finder’s power requirements. Consider battery placement for weight distribution and ease of access.
Tip 5: Display Unit Positioning: Mount the display unit within easy reach and clear view for optimal visibility while paddling. Consider using a RAM mount or similar adjustable system for flexibility.
Tip 6: Waterproofing: Ensure all connections and exposed wiring are properly sealed and waterproofed to prevent damage from water exposure.
Tip 7: Test Before Deployment: Test the entire system before heading out on the water. Verify the transducer is functioning correctly and the display unit is receiving a clear signal.
Following these guidelines will result in a clean, functional, and durable installation, allowing anglers to focus on fishing rather than equipment troubleshooting.
By understanding the nuances of sonar installation and applying these practical tips, kayak anglers can significantly enhance their fishing experience.
1. Transducer Placement
Optimal transducer placement is paramount for accurate sonar readings and maximizing the effectiveness of a fish finder installed on a kayak. Incorrect placement can lead to interference, turbulent water flow disrupting the signal, and inaccurate depth or fish location data. Understanding the factors influencing transducer placement is crucial for a successful installation.
- Inside Hull (Shoot-Through-Hull) Mounting
This method involves mounting the transducer inside the kayak hull, typically using epoxy. It provides a clean installation and protection from damage. Suitable for smooth, fiberglass hulls, this method avoids drag but may provide slightly less detailed readings compared to external mounts. Signal quality can be affected by hull thickness and material. This approach simplifies attachment by eliminating the need for external hardware, however, it is crucial to select an appropriate epoxy and ensure a smooth, even bond for optimal signal transmission. The kayak’s hull material and shape must be considered for compatibility.
- Transom Mounting
Common on motorboats, transom mounting can be adapted for kayaks. This involves attaching the transducer to the stern. While simple to install, turbulence from the kayak’s movement can interfere with the sonar signal, especially at higher speeds. This method is generally less ideal for kayaks compared to other options due to potential interference. However, it remains a viable option for certain kayak designs and fishing styles, particularly when trolling at slower speeds. Adapting this method for kayaks requires careful consideration of the transducer’s position relative to the waterline to minimize disruptions from surface turbulence.
- Scupper Hole Mounting
Many kayaks feature scupper holes for drainage. Specialized transducer mounts utilize these holes for a convenient and secure installation. This approach provides a protected location for the transducer and avoids drilling into the hull. Scupper hole size and shape must be compatible with the chosen mount. This method provides a practical solution, leveraging existing features on the kayak. However, it is essential to ensure a snug fit to prevent movement or vibration during use. The transducer’s position within the scupper hole should also be optimized to minimize turbulence and ensure accurate readings.
- Side Mounting
Mounting the transducer on the side of the kayak, near the bow, can be effective in calmer waters. This approach minimizes interference from the kayak’s wake. However, it can be more susceptible to damage from obstacles and requires careful placement to avoid interference with paddling. This method presents a balance between performance and practicality. Careful consideration of paddle stroke clearance and potential impact from underwater obstructions is essential. Specialized mounting brackets designed for side installation can enhance stability and reduce the risk of damage.
Selecting the correct transducer placement method depends on the specific kayak design, fishing style, and water conditions. Careful consideration of these factors ensures accurate sonar readings and contributes significantly to the overall success of installing and utilizing a fish finder on a kayak. Each placement option offers distinct advantages and disadvantages that influence installation complexity and the quality of data received.
2. Display Mounting
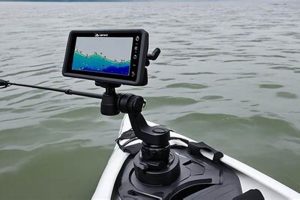
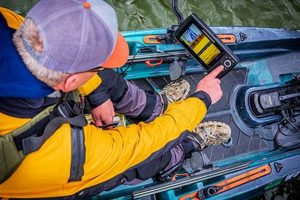
Display mounting is integral to a successful fish finder installation on a kayak. Proper mounting ensures clear visibility, convenient access to controls, and minimal interference with paddling. The mounting location directly impacts usability and the angler’s ability to interpret sonar data effectively. Several factors influence optimal display placement, including kayak type, angler preference, and fishing style. A poorly positioned display can lead to missed information, distractions, and reduced fishing efficiency. Conversely, a well-mounted display contributes significantly to a streamlined and productive angling experience. For example, mounting the display near the cockpit allows quick glances at the sonar data without significant movement, while positioning it too far forward can obstruct the paddle stroke.
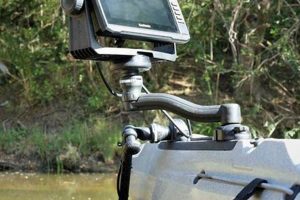
Various mounting solutions cater to different needs and kayak configurations. Common options include RAM mounts, track systems, and specialized kayak-specific mounts. RAM mounts offer flexibility and adjustability, allowing anglers to customize the display’s position. Track systems provide multiple mounting points along the kayak, accommodating various accessories in addition to the fish finder display. Kayak-specific mounts integrate seamlessly with the vessel’s design, offering a clean and secure solution. Choosing the right mounting system depends on factors like available space, desired adjustability, and compatibility with the kayak’s structure. For instance, a sit-on-top kayak might benefit from a track system offering versatility for mounting other accessories, whereas a sit-inside kayak might necessitate a more compact, specialized mount.
Effective display mounting contributes significantly to a positive kayaking and fishing experience. Prioritizing visibility, accessibility, and security ensures the angler can effectively utilize the fish finder’s capabilities. Careful consideration of mounting location and appropriate mounting hardware selection optimizes both functionality and user comfort. Challenges can include limited space on smaller kayaks, vibration affecting display readability, and glare impacting visibility in bright sunlight. Addressing these challenges requires selecting appropriate mounting solutions and positioning the display strategically to minimize interference and maximize usability.
3. Power Connection
Supplying consistent power to a fish finder is fundamental to its operation on a kayak. The power connection method influences battery life, system stability, and overall user experience. Selecting an appropriate power source and ensuring a secure, weatherproof connection are crucial aspects of the installation process. Understanding power requirements and available options allows for informed decisions that align with specific angling needs and kayak configurations.
- Battery Selection
Choosing the right battery involves considering factors like capacity (ampere-hours), voltage (12V is standard for most fish finders), and type (lead-acid, lithium-ion). Lithium-ion batteries offer higher energy density and lighter weight compared to lead-acid, making them a popular choice for kayaks. Battery capacity directly influences runtime; higher capacity translates to longer operation. Selecting a battery with sufficient capacity to power the fish finder for the duration of a typical fishing trip is essential. Balancing weight, capacity, and cost is crucial in battery selection.
- Wiring and Connections
Proper wiring and secure connections are essential for reliable power delivery and preventing electrical issues. Marine-grade wiring and connectors designed for water resistance are crucial. Correctly crimping connectors and using heat shrink tubing ensures a secure and waterproof connection. Routing wiring away from potential snag points and securing it along the kayak’s structure minimizes the risk of damage and interference. Careful attention to wiring details contributes to long-term system reliability.
- Power Distribution
For kayaks equipped with multiple electronic devices, a power distribution system can simplify wiring and provide a central power hub. Fuse boxes or distribution blocks protect individual devices from overloads and shorts. This centralized approach allows for easier management of power connections and reduces clutter. Selecting an appropriately sized distribution system based on the combined power requirements of all connected devices is important.
- Alternative Power Sources
While battery power is most common, alternative power sources like solar panels can supplement or extend battery life. Flexible solar panels designed for mounting on curved surfaces can be integrated into the kayak’s design. Solar charging capabilities offer increased runtime and reduce reliance on traditional battery charging. Integrating solar power involves considering factors like sunlight exposure, panel size, and charging efficiency.
A reliable power connection is integral to a fully functional fish finder setup on a kayak. Correctly integrating the power source influences the system’s overall performance, longevity, and user experience. Considerations regarding battery selection, wiring practices, and potential integration of supplementary power sources contribute to a robust and efficient system, maximizing angling time on the water. The chosen power solution directly impacts the practicality and reliability of the entire fish finder setup.
4. Cable Management
Effective cable management is crucial when installing a fish finder on a kayak. Properly routed and secured cables prevent tangles, minimize interference with paddling, and protect the wiring from damage, ensuring the longevity and reliability of the fish finder system. A well-organized setup contributes to a safer and more efficient kayaking experience. Conversely, neglecting cable management can lead to frustrating tangles, potential damage to the fish finder system, and safety hazards while on the water. This aspect of installation, while often overlooked, is integral to the overall success and usability of the fish finder setup.
- Securing Cables
Securing cables involves using cable ties, clips, or adhesive mounts to firmly attach the wiring to the kayak’s structure. This prevents cables from dangling freely, reducing the risk of entanglement with paddles, fishing gear, or other onboard equipment. For example, routing cables along the underside of the deck or inside scupper holes keeps them out of the way and protected. Proper securing methods minimize wear and tear and prevent accidental disconnection. Secure cable runs contribute to a clean and organized cockpit, essential for maintaining a safe and efficient fishing environment.
- Protecting Cables
Protecting cables involves using protective tubing or conduits to shield the wiring from abrasion, UV exposure, and water damage. Flexible conduit provides a durable barrier against friction and environmental factors. For example, routing cables through sections of split tubing or wrapping them with electrical tape provides additional protection. This preventative measure safeguards the wiring’s integrity, extending the lifespan of the fish finder system. Cable protection ensures reliable operation and minimizes the need for repairs due to environmental wear and tear.
- Routing Strategies
Strategic cable routing involves planning the cable paths to minimize lengths and avoid high-traffic areas. Following the contours of the kayak and utilizing existing channels or recesses keeps cables organized and reduces the likelihood of snags. For example, running transducer cables along the hull’s interior minimizes exposure and maintains a streamlined profile. Efficient routing minimizes excess cable length, reducing clutter and the potential for interference. A well-planned cable route contributes to a cleaner, more professional installation and enhances overall system reliability.
- Connection Points
Properly managing connection points involves using waterproof connectors and ensuring all connections are secure and sealed against moisture. Marine-grade connectors with tight seals prevent water intrusion, protecting the electrical system from corrosion and short circuits. For example, using dielectric grease on connections further enhances water resistance and prevents corrosion. Secure and waterproof connection points contribute to the long-term reliability of the fish finder system, especially in harsh marine environments. Diligence in ensuring watertight connections prevents potential electrical failures and ensures consistent operation.
These cable management practices are essential for a successful and durable fish finder installation on a kayak. A well-executed cable management strategy not only protects the equipment but also contributes to a safer, more organized, and enjoyable kayaking experience. By addressing these considerations during installation, anglers can minimize potential issues and maximize the lifespan and performance of their fish finder system, ensuring a seamless integration with the kayak’s overall functionality.
5. Kayak Compatibility
Kayak compatibility plays a crucial role in determining the feasibility and effectiveness of fish finder installation. Hull material, shape, and available mounting points directly influence transducer placement, display mounting options, and cable routing strategies. Compatibility considerations impact not only the installation process itself but also the long-term performance and usability of the fish finder system. For instance, a sit-on-top kayak with readily accessible scupper holes presents different mounting opportunities compared to a sit-inside kayak with a closed hull. The kayak’s design dictates the practicality of various mounting methods and influences the overall complexity of the installation process. Ignoring compatibility factors can lead to suboptimal transducer placement, compromised stability of mounting hardware, and difficulties in cable management, ultimately affecting the accuracy and reliability of sonar readings.
Understanding the specific characteristics of the kayak is essential for selecting appropriate mounting hardware and planning the installation layout. Smooth, flat surfaces on a rigid hull offer greater flexibility for adhesive mounts, while irregular or textured surfaces might necessitate specialized brackets or clamps. Kayaks with integrated track systems provide convenient mounting points for displays and other accessories, simplifying installation and offering greater flexibility in positioning. Evaluating the kayak’s structural features and considering potential interference from existing hardware, such as paddle holders or rod mounts, is crucial for a successful integration of the fish finder system. For example, installing a transducer near a rudder or propeller can lead to interference with sonar signals, while mounting a display in a location that obstructs paddle movement can hinder maneuverability. Careful planning based on the kayak’s specific design ensures optimal placement of all components and minimizes potential conflicts.
Successful fish finder integration requires a thorough assessment of kayak compatibility. This assessment informs decisions regarding transducer placement, display mounting, cable routing, and power supply integration. Addressing compatibility concerns proactively ensures a secure, functional, and user-friendly installation that enhances the overall kayaking and fishing experience. Overlooking these factors can compromise the system’s effectiveness and lead to difficulties in operation, highlighting the importance of compatibility as a foundational element in the planning and execution of a fish finder installation on a kayak. Ultimately, a well-integrated system contributes to a more productive and enjoyable angling experience, demonstrating the practical significance of understanding kayak compatibility in the broader context of how to attach a fish finder to a kayak.
Frequently Asked Questions
Addressing common queries regarding fish finder installation on kayaks provides clarity and facilitates informed decision-making. These FAQs offer practical insights into various aspects of the process, from equipment selection to installation techniques.
Question 1: What type of fish finder is best suited for kayak fishing?
Portable fish finders designed for kayak use offer a balance of functionality, portability, and ease of installation. Consider factors like screen size, sonar frequency, and power consumption when selecting a unit.
Question 2: Is it necessary to drill holes in the kayak for transducer installation?
Drilling is not always required. Alternative mounting methods, such as scupper hole mounts or adhesive mounts, offer non-destructive installation options. The chosen method depends on kayak compatibility and transducer type.
Question 3: How long can a fish finder operate on a single battery charge?
Battery life depends on battery capacity, fish finder power consumption, and usage patterns. Lithium-ion batteries generally offer longer runtimes compared to lead-acid batteries. Selecting an appropriately sized battery ensures sufficient power for a typical fishing trip.
Question 4: Can a fish finder interfere with other electronic devices on the kayak?
Interference is possible but generally minimal with proper installation and grounding. Ensuring adequate separation between electronic devices and using shielded cables can mitigate potential interference.
Question 5: What maintenance is required for a kayak fish finder?
Regularly check and clean all connections, ensuring they remain waterproof and free of corrosion. Protect the display unit from direct sunlight and extreme temperatures. Proper storage and maintenance practices extend the lifespan of the fish finder system.
Question 6: What are the advantages of using a GPS-enabled fish finder on a kayak?
GPS functionality allows for marking waypoints, tracking routes, and navigating to specific locations. This feature enhances fishing efficiency and safety, particularly in unfamiliar waters or challenging conditions. GPS integration provides valuable navigational assistance and allows anglers to record and revisit productive fishing spots.
Understanding these commonly addressed concerns provides a foundation for successful fish finder installation and operation. Addressing these practical considerations ensures a smooth integration of the technology and maximizes its benefits on the water.
This concludes the frequently asked questions section. The following section will provide a step-by-step guide to installing a fish finder on a kayak.
Conclusion
Successfully integrating a fish finder onto a kayak involves careful consideration of several key factors. From transducer placement and display mounting to power connection and cable management, each step contributes significantly to the system’s overall effectiveness and longevity. Kayak compatibility plays a crucial role in determining appropriate mounting methods and ensuring a secure, functional installation. Understanding these interconnected elements empowers anglers to make informed decisions, optimizing their fish finder setup for their specific needs and kayak configuration. A well-planned and executed installation maximizes the benefits of sonar technology, enhancing angling success and overall enjoyment on the water.
Strategic planning and meticulous execution are essential for a successful fish finder installation. By understanding the various components, mounting options, and best practices outlined in this guide, anglers can confidently equip their kayaks with advanced sonar technology. This knowledge translates to improved fishing experiences, increased efficiency on the water, and a deeper understanding of the underwater environment. The ability to effectively utilize a fish finder unlocks new possibilities for exploration and angling success, further enriching the kayak fishing experience.


