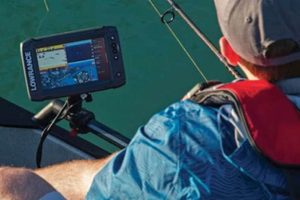
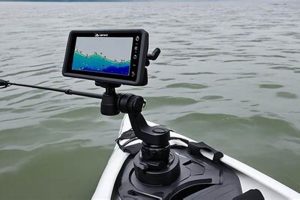
Securing a sonar device to a small, human-powered watercraft enables anglers to locate fish and understand underwater terrain. This involves selecting an appropriate location on the kayak, considering factors like paddle stroke interference and visibility, then attaching the device using specialized mounts and hardware. For example, a transducer can be attached to the hull or a retractable arm, while the display unit might be mounted near the cockpit using a RAM mount or similar system.
This practice enhances angling success by providing real-time data about water depth, fish presence, and bottom structure. Historically, kayak anglers relied solely on intuition and experience. Contemporary technology offers a significant advantage, allowing for strategic fishing in unfamiliar waters and increasing the likelihood of finding and catching target species. This improvement contributes not only to recreational enjoyment but also to conservation efforts by reducing time spent searching for fish and minimizing environmental disturbance.
The following sections will explore specific techniques for transducer and display placement, suitable mounting hardware options, power supply considerations, and cable management best practices for a clean and functional installation.
Tips for Fish Finder Installation on Kayaks
Proper installation ensures optimal fish finder performance and longevity while maintaining kayak stability and user convenience. The following tips offer guidance for a successful installation.
Tip 1: Transducer Placement: Consider water turbulence and potential interference. Hull mounting provides a clean look and minimal drag, but side mounting or using a retractable arm may be necessary for kayaks with complex hull designs. Avoid placing the transducer directly behind scupper holes or near areas of significant water flow disruption.
Tip 2: Display Mounting: Prioritize visibility and accessibility without impeding paddling. Utilize adjustable mounts that allow for customization based on individual preferences and kayak layout. Ensure the display is within easy reach for adjustments while maintaining a clear line of sight.
Tip 3: Cable Management: Securely route cables along the kayak using clips or ties to prevent entanglement and damage. Keep cables away from moving parts, such as the rudder or paddle, and ensure sufficient slack to accommodate kayak flex.
Tip 4: Power Supply: Choose a suitable power source based on fish finder requirements. Sealed lead-acid batteries offer a reliable option, while lithium-ion batteries provide a lightweight alternative. Ensure proper battery mounting and secure connections.
Tip 5: Waterproofing: Thoroughly seal any holes drilled in the kayak hull using marine-grade sealant. Protect exposed connections and components from water intrusion to prevent damage and ensure reliable operation.
Tip 6: Testing and Adjustment: Test the fish finder in shallow water before venturing further. Adjust transducer sensitivity and display settings as needed for optimal performance in various conditions.
Careful consideration of these factors ensures a streamlined, functional installation that enhances the angling experience without compromising kayak performance.
By following these guidelines, anglers can equip their kayaks with fish finders effectively, improving their chances of success on the water.
1. Secure Mounting
Secure mounting forms the foundation of a successful fish finder installation on a kayak. A stable and robust mounting system ensures consistent operation, protects the device from damage, and contributes to the overall safety of the angler. Without secure mounting, the fish finder becomes susceptible to vibrations, impacts, and water damage, potentially compromising its functionality and leading to premature failure.
- Vibration Dampening
Kayaks, by nature, experience vibrations due to paddling, water conditions, and impacts. A secure mounting system must effectively dampen these vibrations to prevent damage to the fish finder and ensure accurate readings. Specialized mounts incorporating vibration-absorbing materials, such as rubber or specialized polymers, effectively isolate the device from these disturbances. Without adequate dampening, vibrations can loosen connections, damage internal components, and negatively impact transducer performance.
- Impact Resistance
Kayaks often encounter unexpected impacts, whether from underwater obstacles, collisions with other objects, or simply from loading and unloading. Secure mounting safeguards the fish finder from these impacts, minimizing the risk of damage. Robust mounting hardware constructed from durable materials, such as reinforced plastics or marine-grade aluminum, provides the necessary protection. Inadequate impact resistance can lead to cracked displays, broken housings, and internal component failure.
- Waterproofing
Operating in a marine environment necessitates a high degree of waterproofing for all electronic devices. Secure mounting plays a crucial role in maintaining this waterproofing. Properly sealed mounts prevent water intrusion into the fish finder’s sensitive electronics. This includes using waterproof seals, gaskets, and appropriately sealed cable entries. Failure to prioritize waterproofing can result in corrosion, short circuits, and ultimately, device malfunction.
- Stability in Varying Conditions
Kayaks operate in diverse conditions, encountering waves, currents, and wind. Secure mounting ensures the fish finder remains stable and functional regardless of these external forces. Utilizing adjustable mounts with locking mechanisms allows for customized positioning and securement. Instability in challenging conditions can lead to inaccurate readings, difficulty viewing the display, and potential damage from excessive movement.
These facets of secure mounting contribute directly to the long-term performance and reliability of a kayak-mounted fish finder. By prioritizing secure mounting, anglers ensure consistent data acquisition, prolong the lifespan of their equipment, and enhance their overall fishing experience.
2. Optimal Positioning
Optimal positioning of a fish finder on a kayak directly influences its usability and effectiveness. Placement must balance accessibility for operation with minimal interference to paddling and other on-board activities. Incorrect positioning can render the device impractical, obscuring crucial information or hindering kayak maneuverability. Consider a scenario where the display is mounted too far forward, requiring excessive leaning to view, compromising balance and paddling efficiency. Conversely, a display mounted too low might be susceptible to water spray or paddle strikes. Optimal placement ensures the display remains readily visible and operable without disrupting the angler’s movements.
Several factors influence optimal positioning. Kayak design, including cockpit layout and deck space, plays a significant role. Angling style also contributes; a trolling angler might prioritize transducer placement for optimal side-scanning, while a still-fishing angler might prioritize display visibility directly in front. Furthermore, individual physical characteristics, such as height and arm reach, influence optimal placement. Adjustability in mounting hardware allows customization to accommodate these individual needs and preferences. For example, an angler with a longer torso might require a longer mounting arm to position the display comfortably within reach.
Understanding the relationship between optimal positioning and successful fish finder integration is paramount. Careful planning and consideration of individual needs and kayak design contribute to a functional and efficient setup. This translates directly to enhanced angling performance by maximizing the utility of the fish finder without compromising kayak control or angler comfort. Ignoring these principles can lead to a frustrating experience, diminishing the benefits of having a fish finder in the first place. Careful planning and execution are crucial to optimizing the benefits of this valuable tool.
3. Cable Management
Effective cable management is crucial for a successful fish finder installation on a kayak. Unsecured or poorly routed cables create safety hazards, interfere with paddling, and increase the risk of damage to both the fish finder system and the kayak itself. Proper cable management ensures a clean, functional installation, minimizing the potential for entanglement, damage, and interference.
- Securing Cables
Loose cables present entanglement hazards, particularly with paddles, fishing gear, and other on-board equipment. They can also snag on underwater obstacles, potentially damaging the fish finder system or even capsizing the kayak. Using cable clips, ties, or adhesive channels secures cables along the kayak’s deck and hull, preventing unwanted movement and minimizing the risk of entanglement or damage. For example, routing transducer cables along the inside of the hull, secured with adhesive clips, keeps them protected and out of the way.
- Protecting Cables from Damage
Exposure to UV radiation, saltwater, and abrasion can degrade cable insulation over time, leading to shorts and malfunctions. Routing cables through protective tubing or channels shields them from these elements, extending their lifespan. Additionally, avoiding sharp bends or kinks during installation prevents internal damage to the cable conductors. Consider, for instance, using a section of split loom tubing to protect the power cable where it passes through a bulkhead fitting.
- Minimizing Interference
Improperly routed cables can interfere with the fish finder’s transducer signal, resulting in inaccurate readings or loss of functionality. Keeping cables away from the transducer and other electronic devices minimizes this interference. Additionally, avoiding coiling excess cable near the transducer prevents signal distortion. For example, keeping the transducer cable separate from the power cable and using ferrite beads can help suppress electromagnetic interference.
- Maintaining Kayak Functionality
Poor cable management can hinder kayak maneuverability and impede access to essential equipment. Carefully planning cable routes ensures cables do not interfere with paddling, rudder operation, or access to hatches and storage compartments. For instance, routing cables along the gunwales, rather than across the deck, keeps them clear of the paddling zone.
These aspects of cable management contribute significantly to the overall success and longevity of a kayak fish finder installation. By addressing these considerations, anglers ensure a safe, functional, and aesthetically pleasing setup, maximizing the benefits of their fish finder while preserving the integrity and performance of their kayak. A well-executed cable management strategy reflects a commitment to both functionality and safety, ultimately enhancing the angling experience.
4. Power Source
Power source selection and integration are critical aspects of mounting a fish finder on a kayak. The chosen power source directly impacts operational duration, fish finder performance, and overall kayak weight and balance. An inadequate power supply can lead to premature battery depletion, intermittent fish finder operation, and potential damage to the device. Conversely, a robust and appropriately sized power source ensures consistent performance, extended operating time, and a more productive angling experience. For example, a small, low-capacity battery might only power a fish finder for a few hours, while a larger, deep-cycle battery can provide power for an entire day of fishing.
Several power source options exist for kayak fish finders, each with advantages and disadvantages. Common choices include sealed lead-acid (SLA) batteries, lithium-ion batteries, and kayak-specific power packs. SLA batteries offer a cost-effective solution with good capacity, but they are heavier than lithium-ion alternatives. Lithium-ion batteries provide superior energy density, resulting in a lighter overall weight, but they typically come at a higher cost. Kayak-specific power packs often integrate battery management systems and additional features, such as USB charging ports, but may require specialized mounting hardware. The choice depends on individual needs and priorities, including budget, desired runtime, and weight sensitivity. A kayak angler prioritizing long trips might opt for a high-capacity lithium-ion battery, while an angler focused on short excursions might find an SLA battery sufficient.
Effective power source integration involves secure mounting, proper cable management, and appropriate connection hardware. The battery should be securely fastened to the kayak to prevent shifting during paddling or transport. Cables must be routed carefully to avoid interference with other kayak components and protected from potential damage. Using marine-grade connectors and wiring ensures reliable power delivery and minimizes corrosion risk. Furthermore, understanding battery charging requirements and implementing appropriate charging practices extends battery lifespan and ensures consistent power availability. Failure to address these considerations can lead to power failures, equipment damage, and a compromised angling experience. Proper power source management is therefore essential for maximizing the effectiveness and longevity of a kayak-mounted fish finder.
5. Transducer Placement
Transducer placement is a critical aspect of mounting a fish finder on a kayak. Optimal transducer placement ensures accurate sonar readings, maximizing the effectiveness of the fish finder and contributing directly to angling success. Incorrect placement can result in distorted readings, interference, or complete signal loss, rendering the fish finder useless. Understanding the factors influencing transducer placement allows anglers to optimize their setup for specific fishing conditions and kayak characteristics. This discussion explores key facets of transducer placement relevant to kayak installations.
- Hull Design and Material
Kayak hull design and material significantly influence transducer placement. Smooth, flat surfaces provide the ideal mounting location for most transducers. Complex hull shapes, such as those with pronounced chines or keels, may require specialized mounting solutions or alternative placement strategies. Transducer compatibility with hull material must also be considered. Some transducers adhere directly to the hull, while others require through-hull mounting. For instance, a kayak with a pronounced keel might necessitate mounting the transducer on a separate arm extending below the keel to ensure it sits in undisturbed water.
- Water Turbulence and Interference
Turbulent water flow around the kayak can interfere with transducer operation, creating inaccurate or inconsistent readings. Positioning the transducer away from areas of high turbulence, such as directly behind scupper holes or near the paddle strokes, is essential for optimal performance. Additionally, interference from other onboard electronics, such as trolling motors or bilge pumps, must be minimized by separating the transducer cable from other wiring and utilizing appropriate shielding techniques. For example, mounting the transducer slightly off-center and forward of the stern can minimize interference from the kayak’s wake.
- Target Fishing Depth and Species
The target fishing depth and species influence transducer selection and placement. Deep-water fishing necessitates a transducer capable of operating at lower frequencies, while shallow-water fishing allows for higher-frequency transducers optimized for detail. Similarly, targeting specific species may influence transducer selection based on the fish’s typical habitat and behavior. For example, anglers targeting bottom-dwelling fish in deep water might choose a low-frequency transducer with a narrow beam angle for precise bottom tracking.
- Mounting Methods and Hardware
Various transducer mounting methods exist, including through-hull, transom mount, and retractable arm mounts. Each method presents advantages and disadvantages related to installation complexity, performance, and kayak modification requirements. Through-hull mounting provides the most direct sonar contact with the water but requires drilling holes in the kayak’s hull. Transom mounts are easier to install but may be more susceptible to turbulence. Retractable arm mounts offer flexibility for adjusting transducer depth and position but can be more susceptible to damage. The chosen method must align with the angler’s specific needs and kayak configuration.
Careful consideration of these factors ensures effective transducer placement, optimizing fish finder performance and maximizing the angler’s ability to locate and target fish. Integrating these principles into the overall mounting process is crucial for creating a seamless and effective fish finder setup, ultimately enhancing the angling experience. Proper transducer placement transforms the fish finder from a simple electronic device into a powerful tool for understanding the underwater environment and improving angling success.
Frequently Asked Questions
Addressing common queries regarding fish finder installations on kayaks clarifies potential uncertainties and facilitates informed decision-making. The following responses offer practical guidance for various aspects of this process.
Question 1: What type of fish finder is best suited for kayak fishing?
Units specifically designed for kayak use or portable models offer suitable features and mounting options. Consider display size, sonar capabilities, and power consumption when selecting a model. Compact units with GPS and chartplotting capabilities are often preferred.
Question 2: Is it necessary to drill holes in the kayak for transducer installation?
Not always. While through-hull mounting provides optimal performance for some transducers, alternatives such as transom mounting or utilizing a scupper hole mount avoid hull penetration. Consider transducer type and kayak design when determining the most suitable mounting method.
Question 3: How does one power a fish finder on a kayak?
Typically, a dedicated 12-volt battery powers kayak fish finders. Sealed lead-acid or lithium-ion batteries are common choices, offering varying trade-offs between cost, weight, and capacity. Ensure the chosen battery provides sufficient capacity for the intended fishing duration.
Question 4: Can existing wiring in the kayak be used for the fish finder?
Generally, it is recommended to use dedicated wiring for the fish finder to avoid potential interference or overloading existing circuits. Consult the fish finder and kayak manufacturer’s guidelines for wiring specifications and best practices.
Question 5: What considerations are relevant for cable management during fish finder installation?
Securely routing and protecting cables is paramount. Utilize cable clips or ties to prevent entanglement and protect cables from abrasion and UV exposure. Avoid routing cables near moving parts or areas where they may be subjected to damage.
Question 6: How does one ensure the fish finder installation does not compromise kayak stability?
Distribute weight evenly within the kayak and consider the combined weight of the fish finder, battery, and mounting hardware. Avoid placing heavy components high on the kayak or in locations that may significantly alter its center of gravity.
Addressing these frequently asked questions provides a foundation for successful fish finder installation on a kayak. Careful planning and execution, informed by these considerations, contribute to a safe, functional, and enjoyable angling experience. Diligence in these areas ensures optimal equipment performance and enhances angling opportunities.
Beyond these FAQs, further exploration of specific fish finder models, kayak types, and mounting accessories enhances installation effectiveness. Consult manufacturer guidelines and seek expert advice when needed to tailor the installation to specific requirements.
Mounting Fish Finder on Kayak
Equipping a kayak with a fish finder involves a multifaceted process requiring careful consideration of various factors. Secure mounting, optimal positioning, effective cable management, reliable power supply, and strategic transducer placement contribute significantly to the system’s overall performance and longevity. Ignoring these elements can lead to suboptimal functionality, potential equipment damage, and a compromised angling experience. Understanding the interplay between these components enables anglers to maximize the benefits of their fish finders, transforming them from simple devices into powerful tools for underwater exploration and enhanced angling success.
Strategic integration of electronics enhances angling opportunities from kayaks. Technological advancements continue to refine fish finder capabilities and mounting solutions, offering increasingly sophisticated tools for anglers. Careful consideration of individual needs, kayak characteristics, and environmental factors remains essential for optimizing installations and ensuring long-term satisfaction. Ultimately, a well-integrated fish finder empowers anglers to explore underwater environments with greater precision, increasing their understanding of fish behavior and habitat, and ultimately, improving their chances of a successful catch.


