Equipping a kayak with a sonar device involves several key steps to ensure optimal performance and accurate readings. This process includes selecting the appropriate transducer mounting location, routing power and transducer cables, and configuring the fish finder’s settings based on the kayak’s structure and the fishing environment. For example, transducer placement can vary depending on the hull type, with sit-on-top kayaks often requiring different mounting solutions compared to sit-inside kayaks. Power sources typically involve a sealed 12-volt battery, and cable management is essential for a clean and functional setup.
Accurate depth readings, improved fish location identification, and enhanced understanding of underwater terrain are significant advantages gained from properly installed sonar equipment. This technology has revolutionized recreational fishing, allowing anglers to target specific depths and structures, leading to increased success. Originally developed for commercial fishing, these devices have become increasingly compact and affordable, making them accessible to kayak anglers. This accessibility contributes to the growth and enjoyment of the sport.
The following sections will explore the various aspects of transducer mounting options, power supply choices, cable management techniques, and fish finder configuration. Each of these elements plays a vital role in achieving effective sonar performance from a kayak.
Tips for Kayak Fish Finder Installation
Optimizing a fish finder setup on a kayak requires attention to detail. The following tips offer guidance for achieving a functional and effective installation.
Tip 1: Transducer Placement: Select a location that minimizes turbulence and interference. For sit-on-top kayaks, consider a scupper-mount transducer or an inside-the-hull mounting option. For sit-inside kayaks, an inside-the-hull transducer provides a clean installation and protects the transducer from damage.
Tip 2: Power Source: Utilize a sealed 12-volt battery specifically designed for marine environments. Ensure proper battery placement for weight distribution and accessibility.
Tip 3: Cable Management: Securely route cables using zip ties or adhesive clips to prevent tangling and interference with paddling. Keep cables away from moving parts and sharp edges.
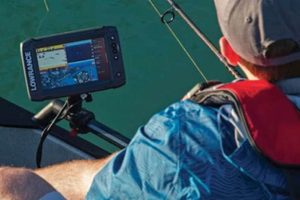
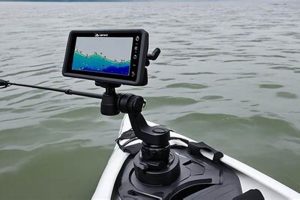
Tip 4: Display Mounting: Position the fish finder display within easy reach and visibility while maintaining an unobstructed view for paddling. Use a mounting arm or bracket compatible with the kayak and the display unit.
Tip 5: Transducer Cable Routing: Minimize the length of the transducer cable to reduce signal loss. Avoid sharp bends in the cable and ensure it is properly connected to both the transducer and the display unit.
Tip 6: Fish Finder Settings: Configure the fish finder settings based on the water conditions and target species. Adjust sensitivity, depth range, and sonar frequency for optimal performance.
Tip 7: Battery Maintenance: Regularly charge the battery and inspect connections for corrosion. Store the battery in a cool, dry place when not in use.
By following these tips, anglers can ensure optimal performance and accurate readings from their kayak fish finder, contributing to a more productive and enjoyable fishing experience.
Following these installation practices will significantly improve the chances of a successful and enjoyable fishing experience.
1. Transducer Placement
Optimal transducer placement is crucial for accurate fish finder operation on a kayak. Incorrect positioning can lead to turbulent water flow interference, inaccurate readings, and reduced effectiveness. Understanding the various mounting options and selecting the correct location based on the kayak’s hull type and fishing environment is essential for maximizing performance.
- Hull Type Considerations
Kayak hull design significantly influences transducer placement. Sit-on-top kayaks offer various mounting locations, including scupper holes and specialized transducer mounts. Sit-inside kayaks often necessitate inside-the-hull mounting or transom mounting. Choosing the appropriate method depends on the specific hull characteristics and desired performance.
- Water Flow and Turbulence
Minimizing turbulent water flow around the transducer is paramount. Placing the transducer in an area with smooth, undisturbed water flow ensures accurate sonar readings. Avoid positioning the transducer directly behind hull features that create turbulence, such as scupper holes or chines. Testing different locations and observing the sonar readings while the kayak is in motion can help identify optimal placement.
- Mounting Methods and Hardware
Several mounting methods exist, each with its advantages and disadvantages. Scupper-mount transducers offer convenient installation on sit-on-top kayaks. Inside-the-hull mounting provides protection and a clean installation but may require epoxy or specialized mounting hardware. Transom-mount transducers are suitable for some kayaks but may be more susceptible to damage. Selecting appropriate mounting hardware ensures a secure and long-lasting installation.
- Interference and Signal Quality
Minimizing interference from other onboard electronics is crucial for clear sonar readings. Keep the transducer cable away from electrical wiring and other potential sources of interference. Proper cable routing and securing the cable with zip ties or clips can help prevent signal degradation. Testing the fish finder in different locations and observing the signal quality can help identify potential interference sources.
By considering these factors and selecting the appropriate transducer placement, anglers can optimize their fish finder’s performance, ensuring accurate readings and improving the chances of a successful fishing trip. The relationship between transducer placement and overall fish finder effectiveness underscores the importance of careful consideration and proper installation techniques.
2. Power Source
A reliable power source is fundamental to the operation of a fish finder on a kayak. Selecting and integrating the correct power supply ensures consistent performance and avoids disruptions during use. Understanding power requirements, battery types, and connection methods is crucial for a successful fish finder setup.
- Battery Selection
Fish finders typically require a 12-volt DC power supply. Marine-grade deep-cycle batteries are recommended due to their ability to withstand vibrations and exposure to moisture. Battery capacity should be chosen based on the fish finder’s power consumption and the intended duration of use. Amp-hour ratings provide an indication of battery life, with higher ratings offering longer operating times. Selecting an appropriately sized battery ensures uninterrupted operation throughout the fishing trip.
- Battery Connections and Wiring
Proper wiring and secure connections are essential for safe and reliable power delivery. Using marine-grade wiring and connectors prevents corrosion and ensures a stable connection. Fuse protection near the battery terminals safeguards the fish finder and other electronics from power surges. Following wiring diagrams specific to the fish finder model ensures correct polarity and avoids potential damage. Meticulous wiring practices contribute to a safe and functional setup.
- Power Consumption and Battery Life
Fish finder power consumption varies depending on the model and features. Understanding the device’s power requirements helps determine the appropriate battery capacity and expected battery life. Factors such as screen brightness and sonar frequency can influence power consumption. Monitoring battery levels during use and recharging the battery after each trip ensures consistent performance and avoids unexpected power loss.
- Alternative Power Sources (Solar, etc.)
While batteries are the most common power source, alternative options like solar panels can supplement or extend battery life. Solar panels offer a sustainable power solution, particularly for longer trips or in areas with ample sunlight. Integrating solar panels requires appropriate charge controllers and wiring to ensure compatibility with the fish finder and battery system. Exploring alternative power sources contributes to environmentally conscious practices and extends operational capabilities.
The correct power source selection and integration directly impacts the fish finders functionality and overall user experience. A stable and reliable power supply ensures consistent operation, allowing anglers to focus on fishing without interruptions. By understanding the various aspects of power management, kayak anglers can maximize the effectiveness of their fish finders and enhance their fishing experience.
3. Cable Management
Effective cable management is a critical aspect of fish finder installation on a kayak. Properly routed and secured cables prevent tangling, interference, and potential damage, ensuring a clean, functional, and safe setup. Organized cabling contributes to efficient operation and prolongs the lifespan of the fish finder and its associated components. Neglecting cable management can lead to operational issues and safety hazards, underscoring its importance in the overall installation process.
- Securing Cables
Securing cables to the kayak prevents them from dangling and interfering with paddling or fishing activities. Using zip ties, adhesive clips, or specialized cable management accessories ensures cables remain in place, minimizing the risk of tangles or damage. For example, routing the transducer cable along the gunwale and securing it with clips prevents it from dragging in the water. Properly secured cables contribute to a safer and more organized cockpit environment.
- Protecting Cables from Damage
Protecting cables from abrasion, UV exposure, and other potential sources of damage is essential for long-term reliability. Routing cables away from sharp edges, moving parts, and areas of high foot traffic minimizes wear and tear. Using protective tubing or sheathing provides additional insulation and safeguards against environmental factors. For instance, routing cables through existing channels or conduits within the kayak’s structure protects them from abrasion. These preventative measures extend the lifespan of the cabling system.
- Preventing Interference
Proper cable routing minimizes the risk of electrical interference that can disrupt fish finder operation. Keeping transducer and power cables separate from other electrical wiring and electronic devices prevents signal degradation and ensures accurate readings. For example, routing the transducer cable away from the power cable minimizes potential interference. This practice ensures optimal fish finder performance and accurate data interpretation.
- Accessibility and Organization
Organized cable routing allows easy access to connections and simplifies troubleshooting. Clearly labeled cables and connectors facilitate maintenance and adjustments. Utilizing cable ties and organizers keeps cables neat and prevents tangles, simplifying future modifications or repairs. For instance, labeling the positive and negative power cables ensures correct connection and prevents accidental reversal. Organized cabling contributes to a more manageable and user-friendly setup.
In conclusion, meticulous cable management is integral to a successful fish finder installation on a kayak. Properly secured, protected, and organized cables ensure optimal fish finder performance, prevent interference, and contribute to a safe and efficient fishing experience. Investing time in comprehensive cable management during the initial setup pays dividends in terms of long-term reliability and ease of use.
4. Display Mounting
Effective display mounting is integral to a functional fish finder setup on a kayak. Proper placement and secure mounting of the display unit ensure clear visibility, easy access to controls, and an unobstructed view for paddling. Incorrect mounting can lead to difficulties in reading the display, operating the controls, and maintaining safe navigation, highlighting the importance of careful consideration and proper installation techniques.
- Visibility and Accessibility
Positioning the fish finder display within easy view and reach is paramount. The display should be angled to minimize glare and reflections while allowing comfortable viewing from the paddling position. Accessibility to controls is crucial for adjusting settings and operating the fish finder without compromising paddling posture or balance. For example, mounting the display on an adjustable arm allows customization based on individual preferences and kayak configuration. Prioritizing visibility and accessibility enhances usability and safety.
- Mounting Stability and Security
A secure mount prevents the display from vibrating excessively or detaching during use, especially in rough water conditions. Utilizing sturdy mounts specifically designed for kayak use and ensuring proper installation prevents damage to both the display unit and the kayak. For example, using a reinforced mounting bracket with stainless steel hardware provides enhanced stability and corrosion resistance. Secure mounting ensures consistent performance and prolongs the lifespan of the equipment.
- Integration with Kayak Layout
Integrating the display mount seamlessly into the kayak’s layout optimizes space utilization and minimizes interference with other equipment and paddling movements. Consider the placement of other accessories, such as rod holders and paddle leashes, to avoid conflicts and ensure a streamlined cockpit layout. For example, mounting the display near existing deck fittings minimizes drilling and maintains the kayak’s structural integrity. Thoughtful integration enhances overall functionality and ergonomics.
- Protection from the Elements
Protecting the display unit from water, sunlight, and other environmental factors ensures its longevity and consistent performance. Consider mounts that offer some degree of protection, or utilize a protective cover when the fish finder is not in use. For example, a mount with a built-in sunshade reduces glare and protects the display from UV damage. Protecting the display from the elements extends its lifespan and maintains its functionality.
Appropriate display mounting significantly influences the overall effectiveness and usability of a fish finder on a kayak. Careful consideration of visibility, stability, integration, and protection ensures a functional and user-friendly setup that enhances the fishing experience. Proper display mounting, combined with other key setup considerations, contributes to a safe, efficient, and enjoyable kayaking adventure.
5. Configuration Settings
Proper configuration of a fish finder is essential for maximizing its effectiveness and obtaining accurate readings. Understanding the various settings and how they interact with the environment and kayak setup directly influences the quality of the data displayed. Configuration settings bridge the gap between the raw data collected by the transducer and the interpretable information presented on the display, making them a crucial component of a successful fish finder setup.
- Sensitivity and Noise Rejection
Sensitivity controls the amount of detail displayed on the screen. Higher sensitivity reveals subtle variations in the underwater environment but can also increase clutter from noise and interference. Noise rejection filters out unwanted signals, allowing for clearer identification of fish and structures. Balancing sensitivity and noise rejection is crucial for accurate interpretation of the sonar data. For example, in shallow, clear water, lower sensitivity with higher noise rejection may suffice. Conversely, in deeper or murky water, higher sensitivity may be necessary to detect fish, but requires careful noise rejection adjustment to avoid excessive clutter. Proper adjustment of these settings directly influences the clarity and accuracy of the displayed information.
- Depth Range and Frequency
Depth range determines the maximum depth displayed on the screen. Selecting an appropriate depth range ensures that the target depth is within the visible range. Sonar frequency affects the detail and penetration of the sonar signal. Higher frequencies provide greater detail but penetrate less deeply, while lower frequencies offer greater depth penetration but sacrifice detail. For example, higher frequencies are ideal for shallow-water fishing and locating baitfish, while lower frequencies are better suited for deep-water applications. Matching the depth range and frequency to the fishing environment optimizes the fish finder’s performance.
- Sonar Display Modes (2D, Down Imaging, Side Imaging)
Modern fish finders offer various sonar display modes. Traditional 2D sonar provides a basic representation of the underwater terrain and fish. Down Imaging provides a detailed, photo-like view of the bottom structure directly beneath the kayak. Side Imaging displays a wider view of the area to the sides of the kayak. Understanding the capabilities and limitations of each mode allows anglers to select the most appropriate view for the given situation. For instance, Side Imaging is valuable for locating structures and cover, while Down Imaging provides precise details of bottom composition. Utilizing different display modes provides a comprehensive understanding of the underwater environment.
- Chart Plotting and GPS Integration
Many fish finders offer chart plotting and GPS integration, allowing anglers to mark waypoints, navigate to specific locations, and track their movements. This functionality enhances navigational capabilities and allows for efficient exploration of fishing areas. Integrating GPS data with sonar readings provides valuable context for interpreting the underwater environment. For example, marking waypoints at productive fishing spots allows anglers to return to these locations easily. GPS integration significantly enhances navigational efficiency and fishing success.
Proper configuration settings are fundamental to extracting meaningful information from a fish finder. Understanding and adjusting these settings based on the specific fishing environment, target species, and kayak setup allows anglers to maximize the device’s potential. The interplay between configuration settings and the other aspects of fish finder setup, such as transducer placement and power management, underscores the importance of a holistic approach to installation and operation. Effective configuration transforms raw sonar data into actionable insights, contributing to a more informed and successful fishing experience.
6. Battery Maintenance
Battery maintenance is inextricably linked to the successful operation of a kayak fish finder. A neglected battery can lead to premature failure, reduced performance, and ultimately, a shortened fishing trip. Proper maintenance ensures reliable power delivery to the fish finder, contributing to consistent operation and accurate readings. For example, failing to charge a battery fully before a fishing trip can result in insufficient power, causing the fish finder to shut down prematurely. Conversely, proper charging and storage practices extend battery lifespan and ensure reliable performance. This understanding is crucial for maximizing the utility of a fish finder and ensuring a productive fishing experience.
Several key practices contribute to optimal battery maintenance. Regular charging prevents deep discharge, a major cause of battery degradation. Storing batteries in a cool, dry environment minimizes self-discharge and prolongs their lifespan. Inspecting battery terminals for corrosion and cleaning them periodically ensures a secure connection and prevents power loss. For instance, storing a battery in a hot car trunk can significantly reduce its capacity and lifespan. Similarly, corroded terminals can impede current flow, resulting in erratic fish finder operation. These practical considerations directly impact the reliability and longevity of the power system.
Effective battery maintenance translates to uninterrupted fish finder operation and accurate readings. A reliable power supply allows anglers to focus on fishing without concerns about power loss or inconsistent performance. This, in turn, contributes to a more enjoyable and productive fishing experience. Addressing battery maintenance proactively minimizes potential disruptions and maximizes the overall effectiveness of the fish finder setup. The relationship between battery health and fish finder performance underscores the importance of incorporating battery maintenance into the broader context of kayak fish finder setup and operation.
Frequently Asked Questions
Addressing common queries regarding sonar device integration on kayaks provides clarity and facilitates successful installation and operation. These responses aim to offer practical guidance and address potential challenges.
Question 1: What type of transducer is best suited for a kayak?
Transducer selection depends on kayak type and fishing environment. Sit-on-top kayaks often benefit from scupper-mount or through-hull transducers, while sit-inside kayaks may require in-hull or transom-mount transducers. Specific fishing conditions, such as shallow or deep water, further influence transducer choice.
Question 2: How is a fish finder powered on a kayak?
Typically, a 12-volt deep-cycle marine battery powers kayak fish finders. Battery capacity should align with power consumption and intended usage duration. Alternative power sources, such as solar panels, offer supplementary options.
Question 3: Where should the transducer be placed on a kayak?
Transducer placement should minimize turbulent water flow and potential interference. Locations near the stern, away from motors and paddles, often prove suitable. Inside-hull mounting provides protection but may require specific hull materials and installation procedures.
Question 4: How are cables managed effectively on a kayak?
Cable management involves securing cables with zip ties or clips to prevent tangling and interference. Routing cables away from moving parts and sharp edges minimizes damage. Proper cable organization contributes to a clean and functional setup.
Question 5: What display mounting options exist for kayaks?
Display mounts range from adjustable arms to fixed brackets. Optimal mounting ensures clear visibility and easy access to controls while minimizing interference with paddling. Mount selection should consider kayak layout and user preferences.
Question 6: How are fish finder settings optimized for kayak fishing?
Optimizing settings involves adjusting sensitivity, depth range, and frequency based on water conditions and target species. Understanding sonar display modes, such as 2D, Down Imaging, and Side Imaging, further refines data interpretation for enhanced fishing success.
Careful consideration of these frequently asked questions facilitates a smooth and successful fish finder integration process, promoting efficient operation and accurate data interpretation for enhanced angling opportunities.
Beyond these frequently asked questions, practical experience and continued learning significantly enhance fish finder utilization and overall fishing success.
Conclusion
Successful integration of a fish finder onto a kayak involves careful consideration of several key factors. Proper transducer placement, mindful power source selection, meticulous cable management, strategic display mounting, and appropriate configuration settings collectively contribute to optimal performance and accurate data interpretation. Understanding these interconnected elements is essential for maximizing the benefits of this technology. Neglecting any aspect can compromise functionality, hindering accurate readings and potentially impacting fishing success.
Effective utilization of fish finder technology significantly enhances angling opportunities from a kayak. Accurate depth readings, precise fish location identification, and detailed understanding of underwater terrain empower anglers to make informed decisions, leading to increased efficiency and improved catches. As technology continues to evolve, further advancements in fish finder capabilities promise even greater insights into the underwater world, further enhancing the kayak fishing experience.


